Saturday, December 8, 2012

Things added: emissive on the walls. Played with post process. Tweaked ao settings, tone mapper, minor bloom and bur to add some "feel" to it. It got darker since i deleted couple of point lights but i'll bring them back.

Monday, December 3, 2012

Water shader

With the help from 3d motive's tutorial, i expanded it with using of course alpha clusters and manual panner to control the speed and direction of the water movement

Simple water mat

Many thanks to 3d motive's water tutorial. Though i still had to implement a lot of stuffs regarding clustered textures

Sunday, December 2, 2012

Minnie Spec

Added some spec

Minor tweak on normal map cluster

Rather than using the component mask, since I'm getting error when I include the alpha channel, I just used the Switch node so i can choose which normal i'm using. My instructions almost doubled

Sunday, November 25, 2012

Same shader network, but I deleted the original normal map network. This is using the derive normal z.
A shader using alpha clusters for the diffuse. I'll change this so that i'm using derivenormalx rather than having these normal maps on their owm texture file. Most of these are parameters so that i can have more control on my material instances.

Friday, November 16, 2012

The ceiling is just a 512*512 black and white image, no alpha. I just used an existing texture to add... texture.

Saturday, November 10, 2012

1. I'll bake out the patterns in order to make my trim set in my level.
2. The hilt of my sword. I might just apply a metal scratch texture rather than sculpting it
3. One of the cap for my columns. I use zsphere and just drew on my mesh. Still needs to be refined

Monday, October 29, 2012

My second environment. Never expected applying tiles to be difficult in objects that tapers. The objects that has a corner was also challenging, depending what the texture is

Sunday, October 28, 2012

Just worked on more assets for my first env. I first made tileable textures and reuse them for most of my assets. No grunge yet. I'll do it probably once I finish texturing everything. Still needs more work of course.

Thursday, October 25, 2012

Please ignore the ugly texture. I just needed textures real quick to test my udk mat. So, I was thinking, rather than creating multiple unique texture maps for my objects, why not use the same tileable textures for objects with the same material: wood, metal, etc. This will save me a lot in terms of texture budget. I have map that depending which channel you connect it to upon Lerping, the textures will only appear on the area. Cons: I find that I'm using more polys to align my uvs based on my texture. It seems flat, especially on a wall surface. There should be a contour or sort on the edges that lets you know it is its own area (marked by the red line). I might have to use an AO maybe? Or just darken the edges in photoshop. Pros: Saves a lot of texture map. I can control the tiling much better. Reusable for other objects


Monday, October 22, 2012

Just did more uving on my assets. I also redid some of my models based on the feedback. I really don't like the tongue.

Friday, October 19, 2012

All these things are from one 1024 by 512 texture map. I was going to have them in different texture map but I thought that I could just optimized them. As a result, putting the details proved to be much more difficult, and they turned to be much low res. I can barely show any details other than their actual color. I just used the Photoshop Fiber filter to add some sort of surface detail. I didn't like the fact that it didn't tiled vertically.
So, the reaper was adjusted. I lowered the polycount and remade the hood. The arms were also shortened. I'm now working on the monster chest and its tongue. The snowman was also changed a bit. These assets are for the HallenHouse environment.
The sword is the main objective for my second environment. I'm using a French sword, King Francis', and it will have a blade like Tidus' The Brotherhood.

Sunday, October 14, 2012

So this is my current assets that I'm using for my level. Only few will have its unique texture space. One thing I might add is walls or floors with different stresses. I will have more unique assets sometime this week.

So, I'm going to explain more in depth what this level is about. Basically, this is a fantasy-medieval game environment where the player must acquire a sword that will allow him to wield an amazing power. He has to travel the walkway which has obstacles waiting, the big round thing that will rotate at a certain radius and shoot out some (maybe water or something) that the player must dodge. Once he acquires the sword, he will now be able to go through the shortcut on left side. I still haven't figure out what I should put on the beginning of the level to stop the player from going there. I was thinking a streaming water that will stop once the sword has been acquired. I was also thinking of having the sword at a higher elevation and rather than straight path, maybe some missing walkway so the players will be forced to jump. Oh and the ceiling will be closed off. I might just use BSP to cover it u.

One thing I noticed though is that the columns not having any faces on top, UDK bakes the shadow improperly. You could see the actual shape of the top, so I'm going to just add the geo back

Saturday, October 13, 2012

Starting to build now in udk. Something about interior scene is that it has so many variables, especially if it's using modular pieces. The layout of the floor, it's elevation, etc. Yeah i can just create a room using bsp or just have the whole layout made in 3d program and just build around but nah. I want it to be as modular as i can. then again i haven't worked in the industry yet so i don't know. Right now, i'm just using all of my modular pieces to make this level. There are only few that are trophy pieces.
So this is my second level. I was thinking that it should be more for a game environment. At first it was just a plain bridge in the middle and water/pool on the side but it seemed too close to one of the concept art i saw. The question now is how i'm supposed to enclosed this area. Hmmmmm

Thursday, October 11, 2012

My evil snowman and man-eating chest


So much time wasted trying to make things work. The treasure chest has to be redone since i just closed its mouth. I also had to repack the snowman. Now, the grim reaper's hood has to be redone, since i found a better way of doing it

Join the crew!


So, this is some of the assets I will use as decorations. For a quick explanation, my main setting is a remote area in Germany(?) and it's Halloween season! Most of the objects' features will be in texture. I want to save some poly and most of the details can just be painted. Still missing a cabbage though. Some of them will be duplicated but not the grim reaper. Lol just one hand it's already 2k poly Also i will have a bunch of floaties as well, representing the cutout papers that people hang in their windows for decor. . All of these have been uvd already so I'm on schedule. YAY! I'll show my main house later along with my modular assets. AWWW

The top image, i'm just testing of i can optimize my poly count and to practice using alphas. This is the handle for the cauldron. When i modeled the whole handle, it was just alot for something like this

Friday, April 27, 2012

Hello 3D coat

Alright. it's been awhile since I posted, again, so I'll post more 3D stuffs I made XD.

WORK in PROGRESS


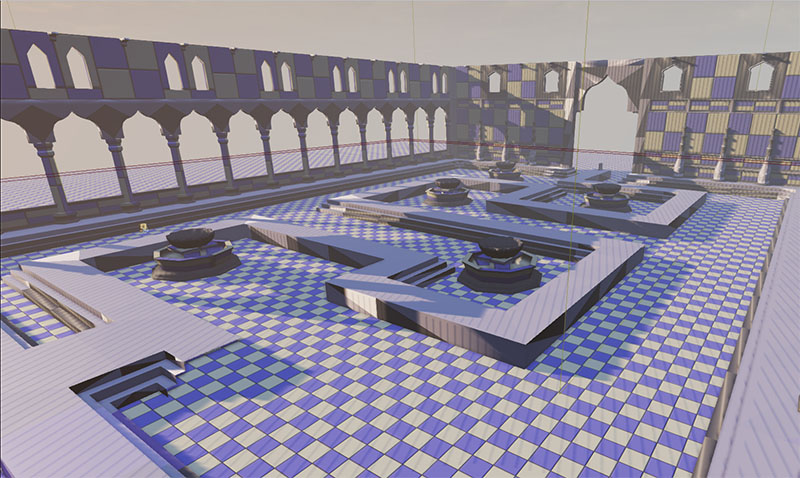
This is a jackal statue you will often see in Egypt. I'm currently making a 3D environment using:
 3DS Max as my modeling platform
Maya for UVing / baking Normal Maps
Zbrush for high poly sculpting/ modeling/ texturing/ baking Normal Maps
3d Coat for retopo
Photoshop for texturing
nDo, Crazybump, and xnormal for baking Normal Maps
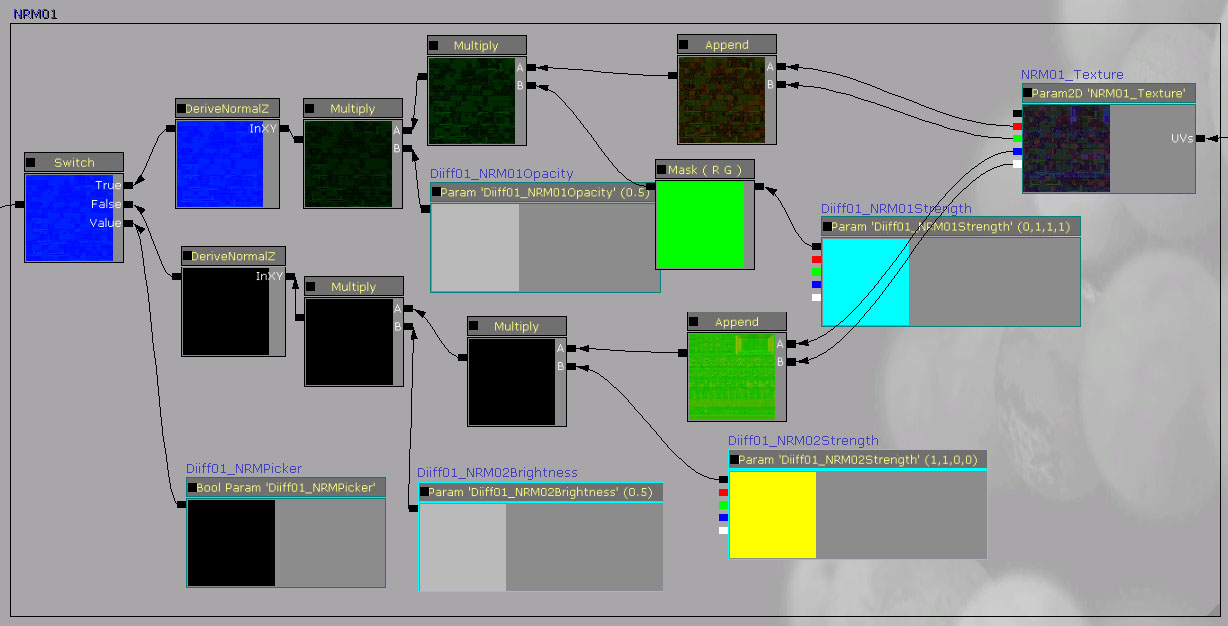
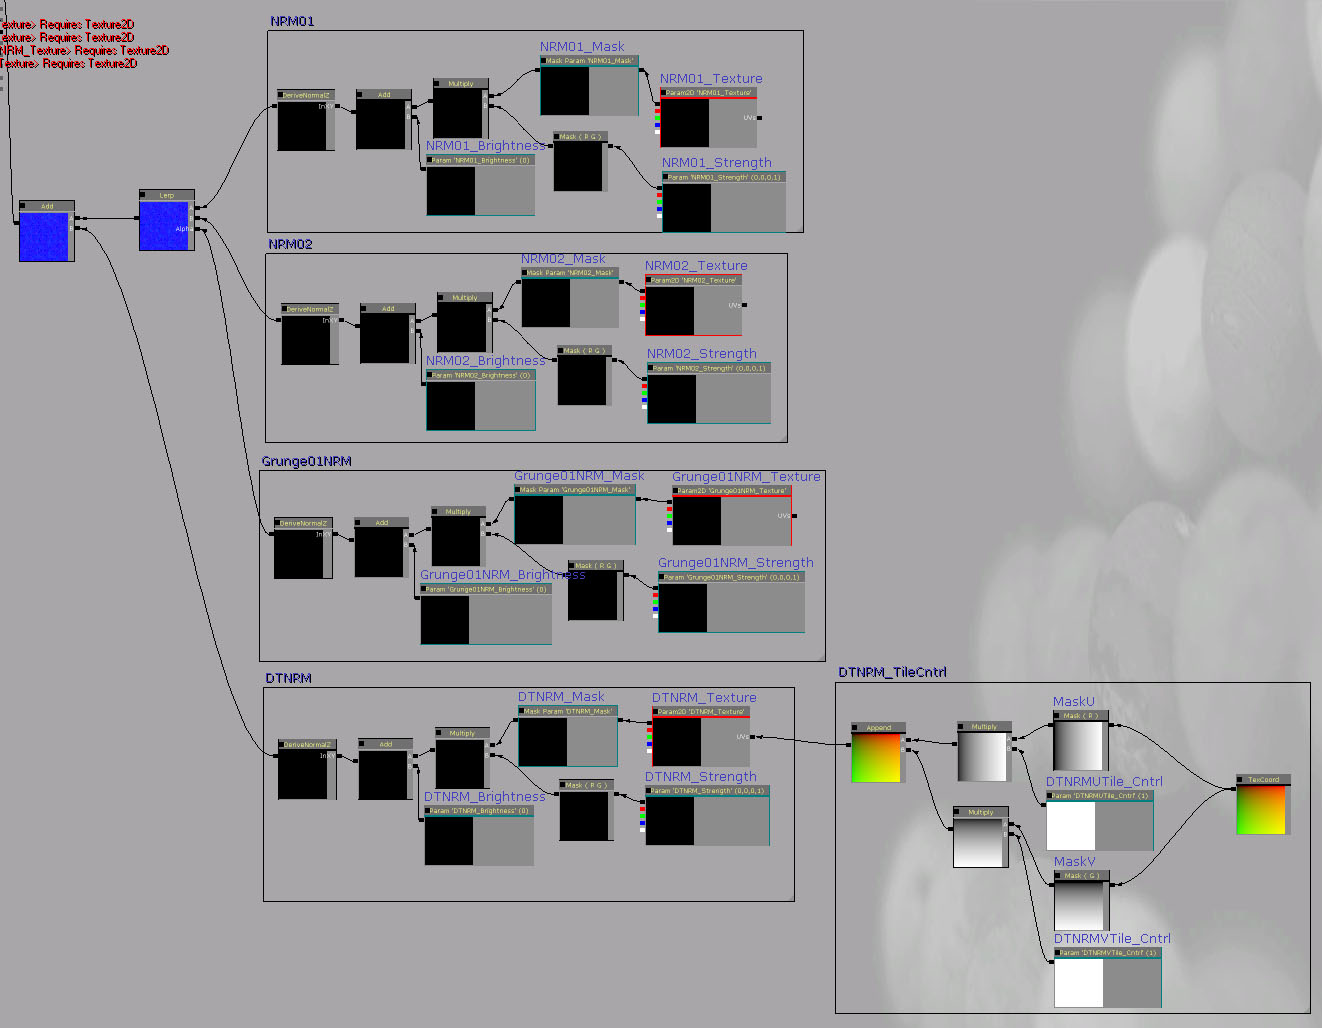
and UDK  for setting up the scene and making shaders to work with my textures

I still have some more areas to refine, thanks to Linh's critique :)
This is also the first model I've ever retopo so I'm pretty happy that I finally got to use 3d Coat